For more about why this author writes sci-fi eco-adventures, visit her website: KHBrower.com

Wednesday, September 14, 2016

Turkey Tail Report: Trametes versicolor Makes a Home in My Back Yard

I first saw my turkey tail patch growing in the early summer following a lot of spring rain on a stump we use for chopping firewood. I wasn't sure, as I'm a novice mycologist, but it had the markers: the ringed color patterns and the nested groupings of the caps. Also, the top side of the caps were fuzzy to the touch. I checked my trusty reference guide and it said to look for whitish spores. But I couldn't see any spores. Perhaps those emerging caps were too young to produce spores. (note to self: Ask an experienced mycologist when the caps typically start producing spores. My guess is there are a number of factors, like air temperature and humidity, in addition to the maturity of the mushrooming body.)

Turkey Tail emerging, July 11, 2016

I didn't think my turkey tail -- and yes, I call it MY turkey tail, for I have abounding, familial affection for my back patio patch -- would thrive in its volunteer location here in Bloomington, Indiana. During midsummer this spot was destined to get full sun for several hours a day, and the stump is too heavy to move without a good reason.

But, before I asked my 6'4" son to roll it back under the shade of the deck so the mushrooms wouldn't struggle in the heat, it rained. It rained a lot here--all summer l-o-n-g. While the western states fried, the midwest flooded and my turkey tail thrived. Here's my mushroom stump a month later.

New growth after the storm, August 14th 
The other side of the stump with another, shorter-lived species, August 18

This past weekend I photographed my turkey tail again, after a couple of weeks of "normal" late summer weather, in other words, HOT. The patch is clearly thriving despite the heat. I love the green rings and wonder why one section of caps has developed a new color scheme. When I shared my pictures with my Mycelium Running seminar tribe, one cautioned my identification, saying she had encountered a turkey tail look-alike.

Is MY turkey tail really Trametes versicolor, or an imposter? September 10, 2016
Under the cap you can see the whitish pore openings where the spores come out -- shot with a macro lens.

So I asked a local mycology prof, Dr. Michael R. Tansey of Indiana University, to verify or set me straight. From the two photos pictured above, this is what he said:
"This is Turkey-tail.  It is our most common mushroom.  It is very common.  I have been out walking today, and it is abundant.  FYI:  Most experienced mushroom people agree that what we call the Turkey-tail is, at the level of analysis of the DNA, many different species.  Indeed, I have seen unpublished DNA data from our local specimens, and they cannot be one "real" species.  I remember one of the most experienced wood-rot fungi experts, years ago, telling me that it must be a dozen species."  
Ta Da! I'm thrilled I correctly identified fungi--even if not DNA-specific in my ID--in the wilds of my back yard. And now that the sun has dropped lower and the stump is in the shade for more of the day, I doubt anything will disturb my turkey tail, until we have really cold weather. Remember, turkey tail is everywhere. See if you can find some in your neighborhood.

To learn more about why I write sci-fi eco-adventures, and to find out more about my work-in-progress and how writing Mission to Blue Grannus requires my research into fungi and myco-remediation, tap on KHBrower.com.

P.S. If anyone has thoughts or recipes about making a medicinal extract, please send them my way. This literary scientist is ready to try most anything.

Tuesday, September 6, 2016

Oyster Mushroom Report 4 of 4:
Two More Clusters

Last week I left you with a real cliff hanger: after I harvested one cluster from my second flush, I saw emergent growth in a handful of clusters around the edge of the bucket.

Day 9 - primordia emerge from clusters that did not thrive in the first flush

Could I keep them happy enough to thrive, or would they shrivel and die in the summer heat or air conditioned air, or suffer oxygen deprivation from life under a humidity tent? There are several variables to consider when growing mushrooms outside a perfectly controlled, lab environment.

Day 10 - No guarantees, but hopeful growth.

Some days I carried the bucket back and forth, into my living room during the heat of the day and out to the screened-in deck for moist night air.

Day 11 - Cautious optimism is in order. The new growth has outpaced the fruit that did not thrive in the first flush.

Two of the five clusters in this third flush continued to thrive. Three did not.

Day 12 - Graceful formations in two clusters.

In the second flush I think I harvested a day too soon, before the outer edges arch upward.  (I'd been frustrated by the coral formation of the first flush and was impatient.) This time, I waited patiently.

Day 13 - The edges never arched upward -- apparently drooping in the heat.
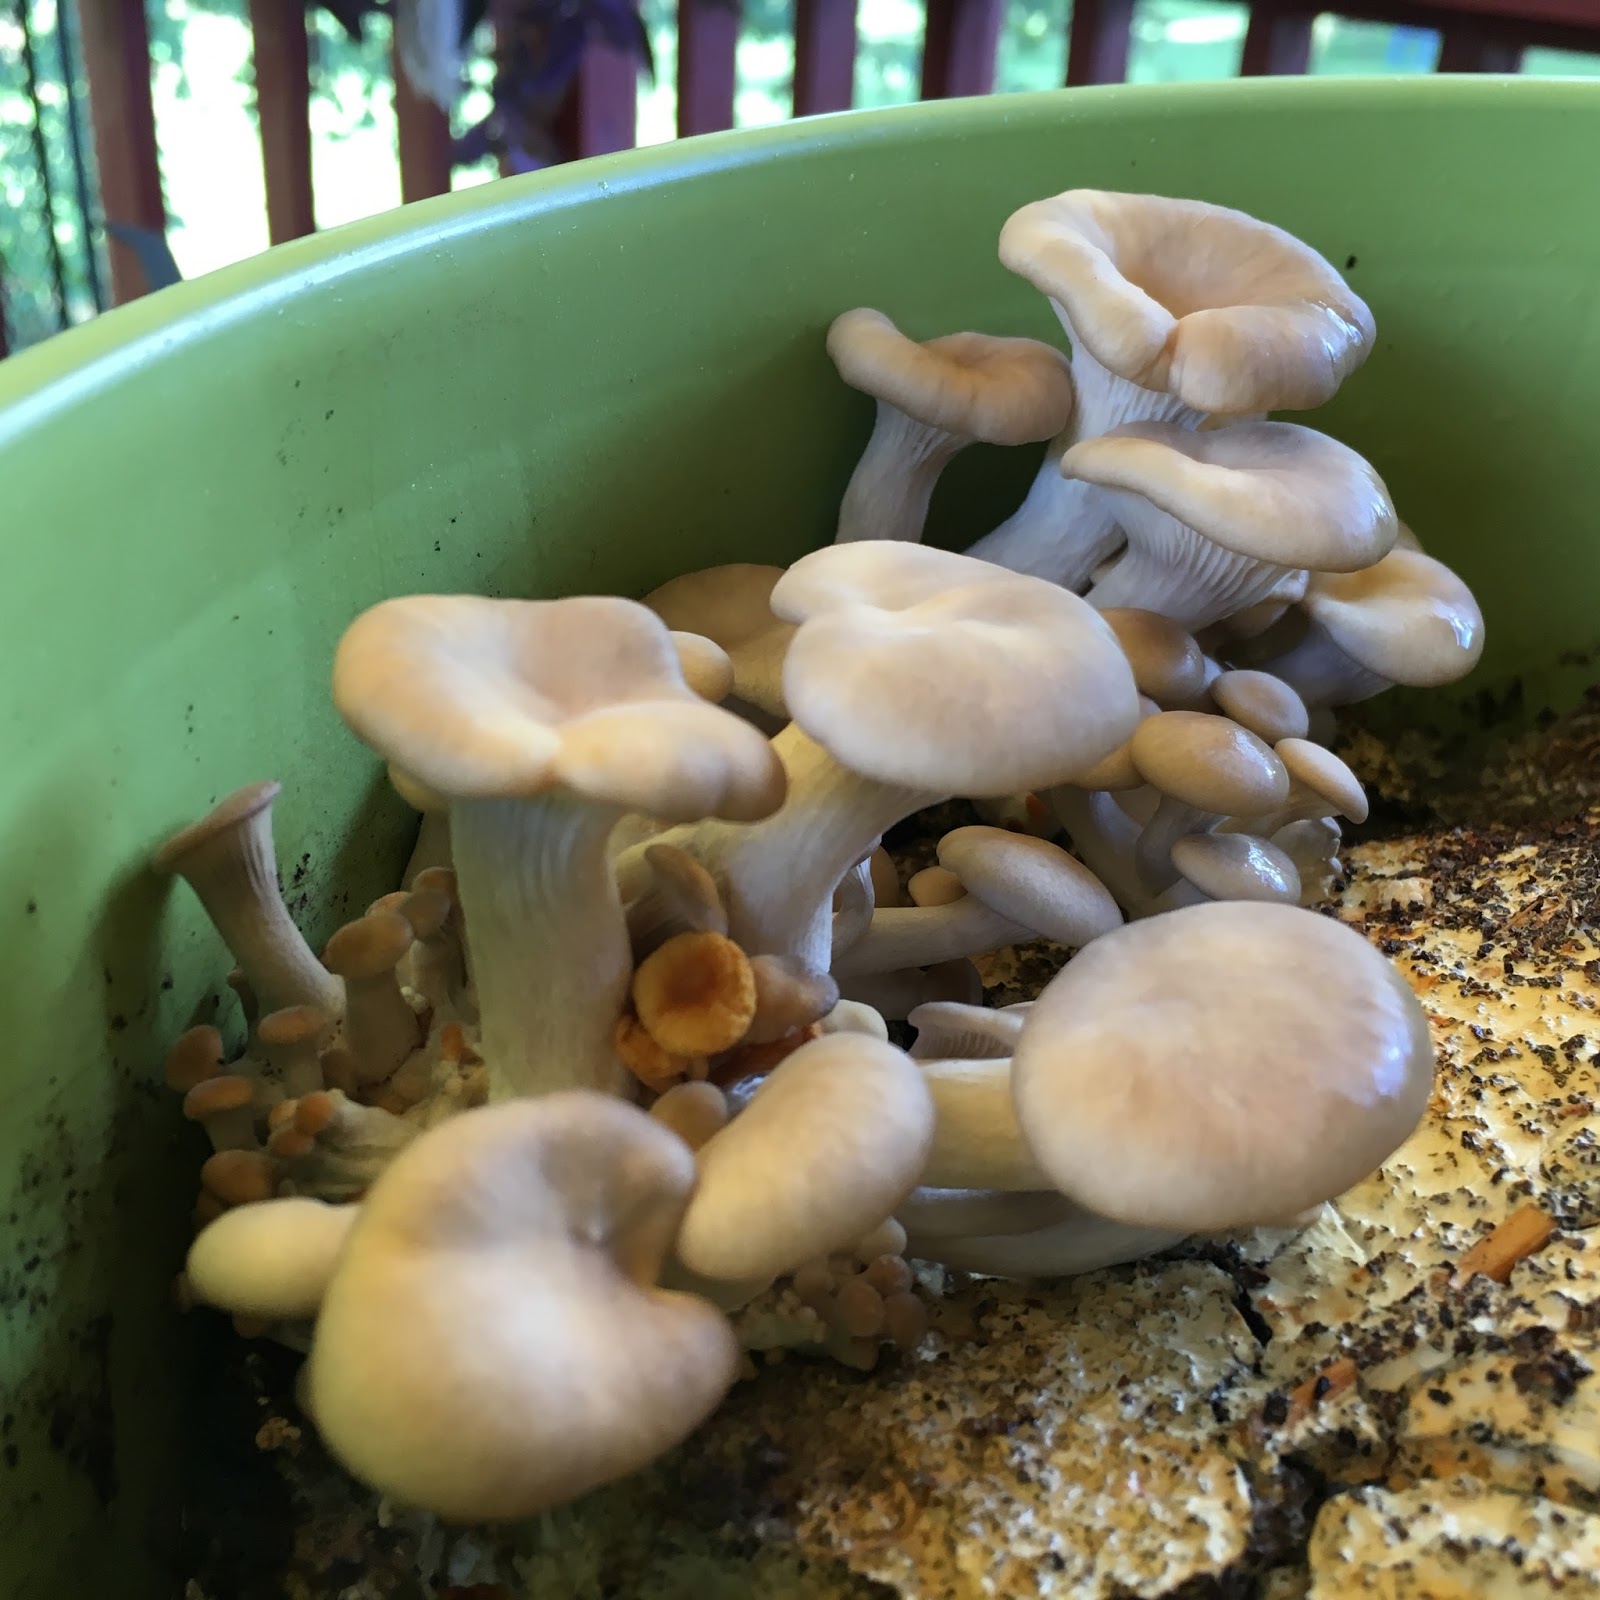
This time I may have harvested a day later than prime, as the outer edges thinned and lost their hearty texture. Regardless, the results were pretty spectacular. Here they are ready to saute along with onions, potatoes and peppers. My son and husband approved of our Labor Day weekend supper.

The dark coffee grounds on the base of the clusters on the far left and top right, help show the growth pattern of a cluster of oyster mushrooms. 

I'll let you know if there's any more action in the bucket. Right now it's at rest, and I'm letting the bucket dry out. 

Meanwhile, I need to get back to a scene in Mission to Blue Grannus. Gordy and Virginia are preparing for their trek to the blue ice caves, where they hope to find the mushroom man.

To learn more about why I write sci-fi eco-adventures, and to find out more about my work-in-progress and how writing Mission to Blue Grannus requires my research into fungi and myco-remediation, tap on KHBrower.com.

Tuesday, August 30, 2016

Oyster Mushroom Report 3 of 4:
Second Flush is a Success

Day 1 - first flush of fruit 

One month after I inoculated coffee grounds in a bucket with healthy mycelium, 5 days after I trimmed back undesirable coral growth and gave the bucket more air by using the tent less and moving outside of the drying air-conditioning, I finally spot emergent mushrooms. These are a much healthier shape than the coral growth I saw last week. 

I'm calling this first siting Day 1.

I captured these tiny primorida using a macro lens.

Day 2 - rapid growth using regular iPhone camera lens

Day 2 - rapid growth


Here I'm pointing to the same cluster pictured above.

Day 3 - continued growth

The next day the growth rate slows a bit. 


Day 4 - close to harvest

The ideal shape for picking is just as the caps uncurl and reach upward creating a funnel shape, and before they flatten out too much.

Morning light on thriving oyster mushrooms. By evening they were ready to harvest and it was dark and I was hungry, so there's no picture of me sautéing these with garlic. Yummy.
Day 5 - after the harvest

At the same time the cluster pictured above had grown, I spotted another handful of clusters begin to emerge. I had high hopes that I'd enjoy a series of small flushes. 

I didn't think it would help to keep them inside for any length of time, because the air-conditioning would dry them out and the humidity tent seemed to starve them of oxygen. So I took the bucked outside.  

Unfortunately, the summer heat got extreme, rising to 90 degrees in the midday, and those temps are not most conducive to oysters. My hopes of more culinary delight were dashed as I watched them start to shrivel.

Day 8 - shriveled clusters

Disappointing, to say the least

Day 8 - 2 of 5 clusters - apparent failure to thrive
Day 9 - what next?


This morning, I was thinking about what I could do to coax more activity from the mycelium patch I've created, and look what I found: fresh emergent growth!

Day 9 - white emergent growth appears around the clusters that didn't thrive. 

I'll let you know what happens next week. 

To learn more about why I write sci-fi eco-adventures, and to find out more about my work-in-progress and how writing Mission to Blue Grannus requires my research into fungi and myco-remediation, tap on KHBrower.com.

Tuesday, August 23, 2016

Oyster Mushroom Report 1 of 4:
How to Inoculate Coffee Grounds

Clusters of primordia surfaced yesterday, one month after I first inoculated the substrate of coffee grounds. Here each of the mushrooms is less than .5 centimeters in diameter. Today they're at least twice as large and, if all goes well, they'll continue to grow rapidly.

To inoculate your substrate (in my case coffee grounds, but you can use other growing mediums), the absolutely first thing you need is to secure your oyster mushroom spawn with mycelium running throughout. My spawn and how to knowledge came from Fungi Perfecti. (They are my go-to resource, and I'm simply showing you that anyone can do this.) There are other commercial sources for mushroom spawn, as well.

These are the supplies I used:
  • 5 gallon plastic bucket 
  • 4-5 pounds of used coffee grounds to use as the substrate/growing medium - free from my local Starbucks, so a very urban/suburban option (Note: If you don't use the grounds right away, you can freeze until you're ready so they don't get skanky.)
  • disposable gloves - wear whenever touching the inside of the bucket or any of the spawn or substrate (coffee grounds)
  • rubbing alcohol and a clean rag
  • oyster mushroom spawn 
Once you have all your supplies, start by preparing the bucket. Drill air holes near the top for air and in the bottom for drainage. (I set the bucket on a large saucer and both atop a stool, so I can easily move my experiment, as needed, to optimum light, temperature, and humidity.) 

The day of inoculation:
  1. Sterilize your bucket with soap and water, then a final rinse of rubbing alcohol. (Remember to wear gloves and/or sanitize your hands with the alcohol before touching the clean bucket.)
  2. Pasteurize your substrate. (I boiled used coffee grounds in non-chlorinated water for 30 minutes and let cool before pouring into my bucket.) 
  3. Mix the coffee grounds with the spawn.


Wait for the mycelium to colonize the bucket. In my case, I saw the first signs of healthy growth in five days.


Wait some more. 

Depending on your results, adjust conditions. In my case, it took a full month from inoculation to seeing mushrooms beginning to fruit. (Last week I showed you what happened when my first flush of oyster mushrooms sprouted in an undesirable coral formation. So, I removed the coral and the plastic humidity tent to provide more oxygen and misted the surface with a diluted hydrogen peroxide solution to treat suspicious, possibly competing green mold.

I'm finally getting good results. Fingers crossed. I'll take pictures every day to record mushroom progress and report next week!

To learn more about why I write sci-fi eco-adventures, and to find out more about my work-in-progress and how writing Mission to Blue Grannus requires my research into fungi and myco-remediation, tap on KHBrower.com.

Tuesday, August 16, 2016

Oyster Mushroom Report 2 of 4:
Overnight Growth is Coral-shaped

Oyster Mushroom Bucket Experiment
This morning I was aghast to find my oyster mushroom bucket experiment and, when successful, culinary treat had grown coral-shaped formations overnight.

My first flush of mushrooms doesn't have enough flesh to make a meal.

Coral-shaped formation--elegant shapes, but undesirable for an oyster mushroom.
This undesirable coral formation has one of two causes:
  1. not enough light
  2. not enough oxygen; too much carbon dioxide
I've had the oyster mushroom bucket in a western facing bay window, where it gets ample indirect light--ideal for this method of propagation. So, I deduce that the cause is not enough oxygen.

I was using a plastic tent to keep the bucket humid. Though I have ventilation holes and three times a day pull the tent off to let the carbon dioxide escape, I deduce I needed to give the patch more time to air each day.

Oyster Mushroom Bucket -- Out for Fresh Air
The weather is perfect today--70 degrees F and raining--so I took the oyster mushroom bucket to my screened in porch. I plan to trim the coral formations and hope for a second flush of edibles.

Pale Green/Gray Mold
Note: Even the coral doesn't grow here.
Near three of the air holes--where I may have carelessly touched the patch to clear coffee grounds away from the hole--first indications of mold appeared today. This is another undesirable development in my experiment, but easy to correct. In the past, light, regular misting of a mild hydrogen peroxide solution has worked for me.


The three steps I plan to take to encourage a second flush of healthy Oyster mushrooms:
  1. give the patch more fresh air
  2. trim the coral back to the mycelium
  3. spray the green mold with hydrogen peroxide solution 
In my next report, I'll give the steps I took to inoculate coffee ground substrate with the spawn I prepared in a June seminar led by Paul Stamets: Mycelium Running: How Mushrooms Can Save the World.

To learn more about why this author writes sci-fi eco-adventures, and to find out more about her work-in-progress and how writing Mission to Blue Grannus requires her research into fungi and myco-remediation, tap on KHBrower.com.
Thank you, Fungi Perfecti, for supplies, training, and inspiration!


Sunday, August 14, 2016

Turkey Tail - After a Summer Storm

Turkey Tail is well-known as a medicinal mushroom, generally beneficial to the immune system and specifically used for cancer treatment. This volunteer emerged here on my back patio five weeks ago.

Thursday, March 10, 2011

Reversible Metabolic Hibernation, a Gift of Immortality

Sci-fi geeks like me dream of technology that will allow astronauts to travel long distances and terra-forming scientists to sleep while a new planet’s evolution works its magic. But why wait for futuristic cryo tubes? Science research has caught up with our dreams!

Watch the 2010 TED talk by Mark Roth. He’s found a way to put mammals into a state of suspended animation, keep them cold, and then reanimate them.


Mark Roth and his team are very close to finding a practical way to make this happen for humans now, maybe this year, certainly in this decade. He calls it “reversible metabolic hibernation” and he wants EMT crews to put people who are experiencing life-threatening medical trauma into suspended animation, until they can be given the life-saving care they need. Then the individual will be reanimated, receiving a gift of immortality.

For more history on the practice of human hibernation, intentional and accidental, see my longer article on GeekMom.com.